Instant Payments: Stripe Tips
May 11, 2025
Today, in 4 minutes or less, you’ll learn:
- Stripe helps mums in business easily accept online payments (including credit and debit cards).
- Setting up is simple: create an account, enter business details, link your bank, and verify your identity.
- Start small and secure: use payment links or invoices first, test with small transactions, and enable two-factor authentication.
Starting your own business is exciting — but figuring out how to get paid can be information overload! Today, I want to walk you through setting up Stripe, one of the most popular and beginner-friendly online payment platforms. This newsletter will focus on the most common questions I receive about using Stripe.
Why Stripe?
I have had a great experience with using Stripe as my payment processor. I have also set up PayPal but prefer Stripe at this stage. When invoicing one-on-one clients, I use Stripe to email my clients a link they can click on to make a credit card payment (for which they automatically receive a receipt). They can also download a copy of their invoice from the email.
Stripe is also great for online stores and integrating with websites or tools like Shopify, Wix, or Squarespace. Stripe helps you accept credit cards, debit cards, and online payments — so you don’t miss a sale.
Stripe has an easy-to-use interface, and I found their chat support helpful when I needed clarification on some formatting on my invoices. I can also integrate Stripe with my online platform, Kajabi so that payments are processed automatically for digital product sales and a receipt is issued.
How do I set up Stripe?
Step 1: Get Your Essentials Ready
Before signing up, have these on hand:
- Your business name (if registered)
- An email address for the business
- Bank account details (to receive payouts)
- ABN (if you’re in Australia) or other tax info
Step 2: Setting Up Stripe
Go to stripe.com and click Start Now
- Fill in your email, name, and password to create an account
- Add your business details: name, industry, website (or social media link)
- Connect your bank account for payout
- Complete identity verification (usually uploading ID)
Once done, you’ll get access to your Stripe dashboard, where you can:
- Create payment links and accept card payments from customers
- Send invoices
- Set up subscriptions
- Integrate Stripe with your website or online store
- See the status of when you will be paid by Stripe for payments that have been processed
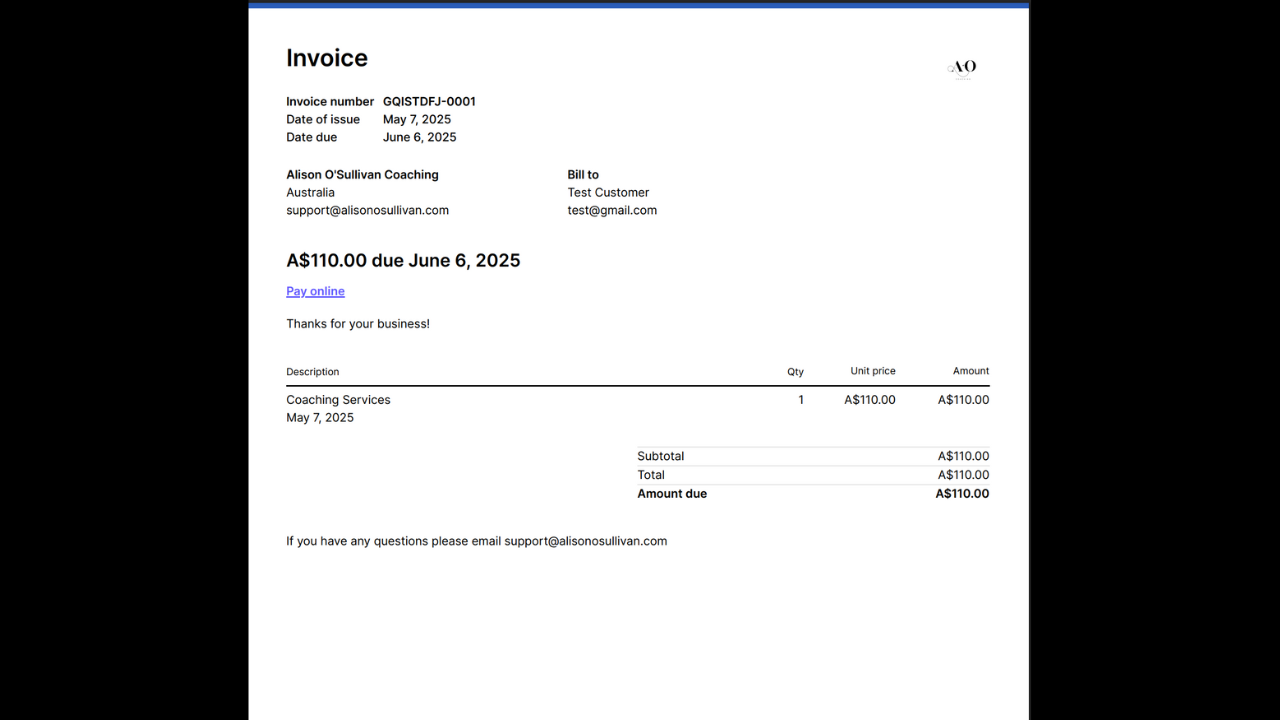
Step 3: Create Your First Invoice
See below for a sample invoice and payment page created in Stripe. Some of the key steps involved include:
- Add your customer name and details for the invoice
- Update the currency
- Add a product (such as coaching services) that your client is paying for
- Update when the payment is due (you can set default payment terms and methods in the 'Invoice' section of Billing Settings)
- Add a memo and/or a footer with any additional information in the 'Invoice' section of Billing Settings
- Add tax if applicable
- Check the format of the invoice, including any branding colours and logos that you have added in the 'Branding' section of Business Account Settings
- Check your support email and contact details are all correct (add these in the Business Account Settings section under 'Business Details')

What are the Fees Charged by Stripe?
I do not pay any monthly or annual fees with Stripe; however, for each payment processed on the platform, I pay 1.70% + AUD 0.30 for domestic cards and 3.5% + AUD 0.30 for international cards (+ 2% if currency conversion is required). Bank debits are charged at 1% + AUD 0.30.
See this link for more detailed pricing information.
Final Tips
- Seek professional advice from an accountant if you are unsure about anything or need specialised guidance for your business.
- There are fantastic resources available on Stripe’s support pages to assist you.
- You can follow a similar process to create a PayPal account for your business.
- Start simple - you don’t need to connect everything at once. You can start by sharing Stripe links with customers.
- Please make a small test payment to yourself to see how it works.
- Enable two-factor authentication on your account for added security.
You’ve Got This!
Setting up a payment system is a big (but important) step toward running a successful business. Remember, you don’t need to be a tech expert — take it one step at a time.
FREE 30 minute 1:1 Zoom Video Strategy Call
Book a free 30 minute Zoom discovery call with me so we can explore what you would love to create, using your teaching strengths as the foundation. We will chat about what is possible, what is realistic right now, and what your next step could be.